
Favorite Recipes
Braised Rabbit with Sweet Garlic, Parsley Root, and Peas
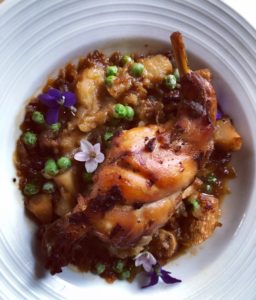
This recipe is simple, beautiful, and comes to us from Jerah Pettibone of Pettibone Urban Game. The slow roasted garlic and parsley root give it a fruity, savory note that is perfect for Spring.
Ingredients
1 whole rabbit, cut into serving pieces
4 yellow onions, diced small
3 parsley roots cut into bite sized pieces (you can peel them if you like, but it’s not necessary)
1.5 tablespoons duck fat
1/2 Cup sweet peas, fresh or frozen
1 head of garlic, peeled and cloves left whole
bay leaf
salt and fresh black pepper
Fresh spring flowers for garnish
Preheat your oven to 257 degrees F. Heat a dutch oven on the stove to medium heat, and add half the duck fat. Sprinkle the rabbit with salt then add it to the pot and brown on both sides. Remove them, and set them aside on a plate.
Add the rest of the duck fat, diced onions and garlic cloves, and cover, cooking them until they are slightly brown and translucent. Add a pinch of salt to taste. Add the parsley root, browned rabbit, and bay leaf. Cover everything with just enough water to barely cover the ingredients. Sprinkle with salt again, and cover. Braise in the oven for 1 hour.
After an hour, uncover the Dutch oven, and return to the oven until the liquid has reduced and the rabbit in a lovely golden brown. Add the peas, another sprinkling of salt and fresh black pepper, stir, and serve, garnishing with spring flowers.
Smoked Spatchcock
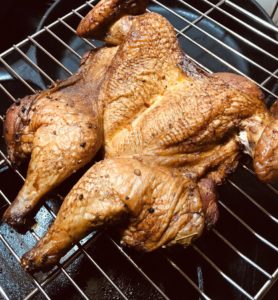
This week we were inspired by the Spring weather to cook outside – but also kinda had that idea on a whim – which was PERFECT. We just grabbed one of our own free range spatchcocks, and threw it in the smoker! Smokers are amazing because all you need to do typically is set them and forget them for a few hours, kinda like a crock pot. Spatchcocks are perfect because they are already marinated, and cut so they can be pulled apart into 4 delicious, smokey servings.
It does take a few tricks to getting it to that perfect smoke level and texture tho, so below is our advice on how to get it just right.
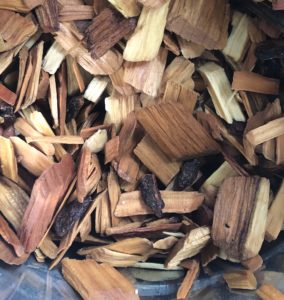
First of all, we recommend choosing your wood carefully. Different woods have impart. Wet different flavors, and you can choose based on smell. We prefer using wood chips over briquettes. You can buy them at most home improvement stores, or you can make your own. Just make sure they’re soaked in water about 20 before you start.
For our whole spatchcock, we set the smoker at 200 degrees. You should follow your smokers manual for how to do this with your unit, and if there is no temperature display, a probe thermometer will do also.
We set the spatchcock out on a wire rack about 30 minutes before we put it in so that it was at room temperature when it started cooking. I know we’ve stressed this method in most recipes posted previously, and there’s a reason – it makes WAY better meat. It’s also another reason why buying and eating quality meat is so important.
Pat the chicken skin dry with a clean paper towel. If you like, you can salt the skin several hours beforehand so it begins to crisp before you smoke it.
Put the chicken in the smoker with a full pan of water to keep the humidity up, and a full box of wood chips: Set a timer for about 4 hours, and then … relax! Play with your kids, have a drink, read a book .. you get the idea.
At the 4 minute marker, open the smoker and check the chicken. It should look darker in color, and have shrunk in size a bit. Test the temperature of the meat by sticking a thermometer in the joint between the leg and breast.
If the meat is at 165 degrees at this point, you can test the texture by sneaking a small piece. We recommend taking it from the breast because this is the leanest cut and dries out the fastest. If it’s not up to temperature, keep the chicken in for another hour, or until it does.
If the meat is at a texture you like, you are ready to take it out and eat!
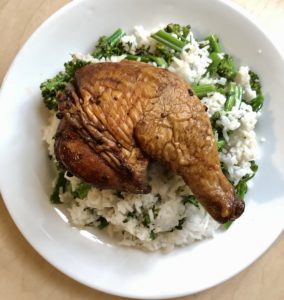
You can serve it hot right out of the smoker, shred it for sandwiches, or chill it for chicken salad. It can store several days in the fridge – if it lasts that long!
The Perfect Seared Duck Breast
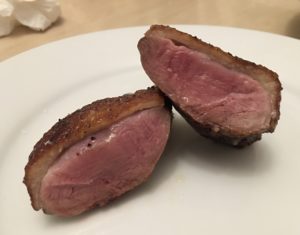
We talk a lot on our social media pages about how amazing a seared duck breast is – but it can be tricky if you’re new to the process – it’s different than a steak, and overcooking it can really ruin the experience.
But if you treat it right, you will be blown away by the result. This is the type of thing you can make for a date, an anniversary, a birthday, or just a Wednesday, because it’s fast – and also incredibly special. Read on.
There are two ways you can prep your duck breast. First, take your fully thawed duck breast out of the package, and pat dry with a paper towel.
Season both sides with generous salt and freshly ground pepper – and maybe a little crushed juniper berry and orange zest too if you’re feeling fancy.
Then you have options. You can sear it right away, or you can let it dry for a while so the skin is extra crispy.
To do this, place the duck breast skin side up on an uncovered baking tray, in your fridge for 12-36 hours. The salt you put on will draw the moisture out of the skin, and make it darker in color and dryer in texture. It will also allow the duck to develop in flavor.
To sear – make sure the duck breast (or any meat for that matter) is at room temperature before it’s cooked.
Add a little oil, butter, or rendered duck fat to a heavy bottom stainless steel pan or iron skillet – olive oil will work, but we recommend an oil with a higher smoke point – you want your pan nice and HOT.
Lay the duck breast skin side down. It should immediately begin to sizzle, and the fat will begin to render off the breast, until it’s searing in about a quarter inch of duck fat.
Let it sear for about 5 minutes, or until that side is a deep golden brown. Flip the duck breast and cook until golden brown on the other side.
Using a meat thermometer, check the internal temperature of the meat. You want to take the breast off the heat when it’s about 150 degrees inside, then let it rest, uncovered, for about 10 minutes. It will continue to cook for a few minutes internally, and settle at a perfect medium to medium rare. We know, this is counter intuitive for poultry, but this is how you want to eat it. It will be tender, buttery, and flavorful. Serve it with a nice steak knife and fork.
You can experiment with different herbs and flavor combinations, adding them to the fat as the duck cooks, or making a pan sauce with the leftover rendered fat. Either way, you will be so proud of what you made and how good it is, we promise. Enjoy!
Tandoori Chicken
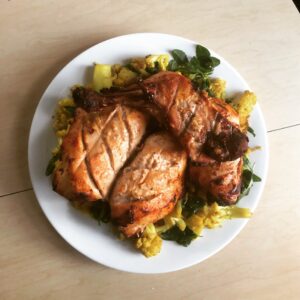
Yes, you can make it at home! This recipe is simple, healthy, and a great way to incorporate new flavors into your weeknight routine. There is no special equipment required.
Ingredients
1 whole chicken, skin removed, and cut into serving pieces – 2 legs, and 1 whole breast
Fresh fenugreek or cilantro leaves for garnish
Brine
1-2 tablespoons hot chili powder (you decide the spice level)
juice of 2 lemons
2 tablespoons kosher salt
Marinade
1/2 cup plain unsweetened yogurt
3 cloves minced fresh garlic
2 fingernails minced fresh ginger
1 tablespoon garam masala
1 tablespoon ground cumin
1 tablespoon ground fenugreek leaves (called ‘methi at Indian’ markets)
2 drops red food coloring (this is optional, and gives the chicken that classic tandoori look you see in restaurants – we didn’t include it in our recipe because we like to appreciate the ingredients as they are)
You’ll need to start this recipe the day before you want to enjoy it.
Cut the chicken into your preferred servings. Make 3 deep, even incisions in each breast as a bias (see the picture).
Then make deep incisions on either side of the bone on both the leg, and the thigh. (You can include wings in this recipe also, but they are they traditionally used – no need to cut them) These cuts allow the brine and marinade to penetrate the meat.
Rub the chicken with the chili powder, lemon juice and salt, and set in a sealed container overnight to brine. In the morning, add all the ingredients in the marinade, and add it to the container. Make sure to get the yogurt mixture into all the nooks and crannies of the chicken, then seal the container back up, and put it back in the fridge.
3 – 8 hours later, remove the chicken from the fridge, and set on an oiled wire oven rack with a pan underneath to catch the drippings.
Set your oven to 425 degrees.
Let the chicken come to room temperature by keeping it on the counter for about 30 minutes. Place the chicken pieces on the wire rack, and season again with salt and pepper.
Roast the chicken in the oven for about 15 minutes. With tongs, flip the chicken pieces to the other side, and roast for about another 15 minutes, until the meat just comes to 165 degrees when a meat thermometer is inserted. Another good way to test doneness is when the meat starts to come away from the leg bone, and the chicken is a golden color, and crispy.
Serve immediately over a bed of roasted cauliflower, basmati rice, or with naan and yogurt raita.
Shakshuka

The only thing better than well-raised eggs is a classic recipe to make with them. Shakshuka is a breakfast favorite on the Mediterranean and throughout the Middle East. It’s hearty, filling, flavorful and good for you too. Plus it’s quick to make, and the ingredients are mostly pantry staples. There are many versions of shakshuka, and here is ours. Makes 6 servings
Here’s what you need
14 ounces crushed canned tomatoes
14 ounces whole canned tomatoes, chopped roughly by hand
1/2 cup onion diced small
4 cloves of garlic, minced
1 whole orange, yellow or red bell pepper, chopped into small pieces
1 tablespoon sherry or balsamic vinegar
a pinch of sugar
2 tablespoons tomato paste
1/4 cup chopped flat leaf parsley
1/4 chopped fresh mint
1 teaspoon sweet paprika
1 teaspoon red pepper flakes
1 1/2 teaspoons ground cumin
2 bay leaves
3 tablespoons extra virgin olive oil
In a heavy bottomed skillet, add the onion and minced garlic, and 2 tablespoons of olive oil to medium heat.
Saute until the onion is translucent, about 3-4 minutes. Add the bell pepper and saute a little longer until the pepper is slightly soft. Add both types of tomatoes to the pan, and bring to a simmer, seasoning with salt and pepper. Then add the cumin, paprika and bay leaf. Cover the sauce and simmer it on low for about 15 minutes, or until it starts to come together. Crack the eggs one at at time on top of the sauce, arranging them evenly around the pan. Season them with salt and pepper, and cover again. Simmer everything gently, letting the eggs bake on top of the sauce for about 10 minutes, or until they are as done as you like them. Garnish with fresh parsley and mint, and the remaining olive oil. (It’s also great with a little feta cheese on top)
Serve this on its own, or alongside warm pita bread, with hummus and kebab, a salad or an olive tray.